

Making a File

1. Move your mouse to the top left corner and click on "File". Then click on "New". The shortcut to this is to hold down the control (Ctrl) button and press "N".
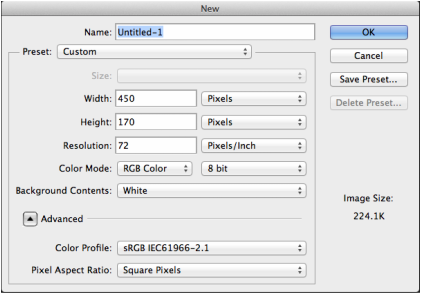
2. Choose your settings. The unit of measurement should be pixels. If the units (to the right of the numbers) aren't in pixels, change them.
For the "Contents" part, it's highly suggested to choose "Transparent", but if you don't choose that, follow the next step.
For the "Contents" part, it's highly suggested to choose "Transparent", but if you don't choose that, follow the next step.
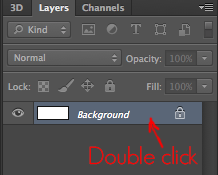
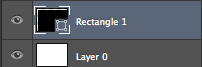
3. Go to your Layers box and check if there's a lock to the right of your layer. If there is, double click on the layer.
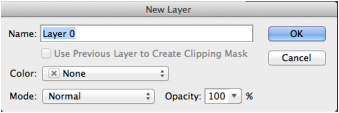
4. Finally, click "OK", and the lock should disappear.
Making a New Layer

There are 3 ways to make a layer:
• Go to Layers > New > Layer
• Click on the button to the left of the trash bin
• Hold down Ctrl, then Shift, and then N
• If you have a Mac, then it's Command instead of Ctrl
• Go to Layers > New > Layer
• Click on the button to the left of the trash bin
• Hold down Ctrl, then Shift, and then N
• If you have a Mac, then it's Command instead of Ctrl
Undo/Redo
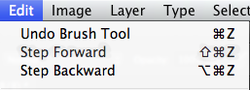
To undo a move, either click on "Edit" at the top of the screen and then "Undo" or hold down Ctrl and then press "Z". You can also press "Step Backward" or hold Alt, then Ctrl, and then Z.
To redo a move, click on "Step Forward" or hold down Shift, then Ctrl, and then Z.
To redo a move, click on "Step Forward" or hold down Shift, then Ctrl, and then Z.
Resizing Objects
1. Go to the Layers box and click on the layer you want to resize.
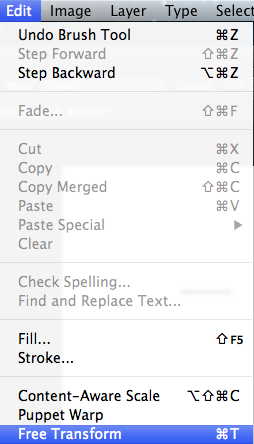
2. Go to "Edit" and click on "Free Transform." You can also click on "Transform" and then "Scale", or hold down Ctrl + T. Either way, a box will appear around the image with small squares on the corners.
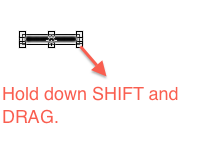
3. When resizing anything, it's best to maintain the proportions. To do so, hold down, move your mouse over to one of the corners, and once you see a diagonal arrow, hold down Shift and start dragging that point. If you don't care about the proportions, ignore the above and use any of the squares on the box.
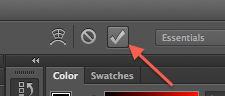
4. Once finished, move your mouse upwards and click on the check that's next to the cancel icon.
Clipping Masks
Clipping masks are very useful when you want to make a mask for a layer out of an image. For example, if you want to make an oval shape out of a city background, you would first have an oval shape underneath the city image. Then, you would turn the city image into a clipping mask, and it'll become an oval shape.
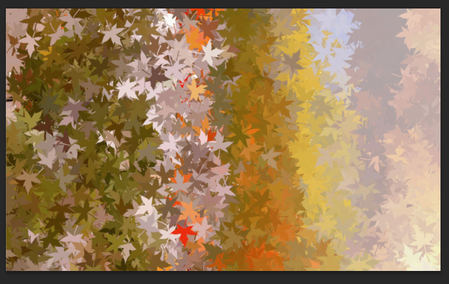
NOTE: For this tutorial, I'll be using one image that I made myself, and another one I got from morguefile.com. I own the image of the girl, but credits for the leaf image goes to the original creator.
NOTE: For this tutorial, I'll be using one image that I made myself, and another one I got from morguefile.com. I own the image of the girl, but credits for the leaf image goes to the original creator.
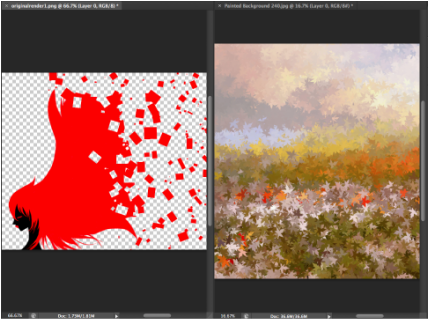
1. Have 2 images open and ready on Photoshop. One should be your "main" image, and the other one (which will be called the "Overlap image" in the next steps) is something that you want to overlap onto the main one. It's best to have them set up like the image to the left so you'll have an easier time dragging for the next step.
Just go to Windows > Arrange > Tile All Vertically
Just go to Windows > Arrange > Tile All Vertically


Additionally, if an image has a lock in the Layers box, make sure to unlock it in order to drag it.
2. Drag the Overlap image onto the main one. In the Layers box, it should appear as another layer on top of the main image layer.

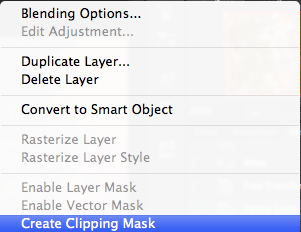
3. Right click or Ctrl + left click on the Overlap image and click "Create Clipping Mask", and you're done!

4. [OPTIONAL] Change the clipping mask up a bit! I changed the mode of mine to Darken. If your main image isn't a plain, one-colored shape, then I suggest playing around with the modes. They might give you an idea to add on to your main image.
Downloading & Uploading Brushes, Fonts, and Patterns
To download brushes, fonts, and/or patterns, just go to Google and search for them. Make sure that they're free and compatible with the version of Photoshop that you have. Fonts don't have any compatibility limits, though, so they're suitable for any version. Sites like Brusheezy will tell you which brushes and patterns are compatible with which version of Photoshop. But, there are sites that don't tell you, so you'll have to download them and try to upload them.
Uploading Brushes in Windows

1. Double click on the file with the brush you just downloaded and copy the file that's an ABR type. Remember that ABR files are always brush files.
2. Go to the Start button and click on Computer > Local Disk C > Program Files > Adobe > Photoshop folder > Presets > Brushes. Next, paste the brush file into the Brushes folder. You can also put it in the "Adobe Photoshop Only" folder, but it won't make a difference.
3. Go to the Photoshop application and click on your Brush tool. Next, click on the tiny triangle that's next to the type of brush and then click on the double arrow that should be close to the brush size option. Find the file name of your brush, click on it, and then click "Append". Your brush file should now appear at the bottom of your brush list. You can also click on "Load Brushes".
Upload Brushes in Mac
Uploading Fonts in Windows
video by: Blue Lightning TV
Uploading Fonts in Mac
video by: Louis Travis
Uploading Patterns in Windows
http://www.obsidiandawn.com/installing-photoshop-patterns-tutorial
Just follow the first step.
Just follow the first step.
